I’ve spent countless hours on trails with both the Osprey Hikelite and Sportlite strapped to my back, and I know how frustrating it can be to choose between two seemingly similar packs.
After testing these backpacks through sweaty summer hikes, unexpected rain showers, and everything in between, I’m ready to share my honest thoughts on which one deserves a spot on your next adventure. This comprehensive review will break down the real-world performance, key differences, and help you decide which pack fits your hiking style best.
A Brief Comparison Table
| Feature | Osprey Hikelite | Osprey Sportlite |
| Capacity Options | 18L, 26L, 32L | 15L, 20L, 25L |
| Weight | 0.95-1.3 lbs | 0.75-1.0 lbs |
| Ventilation System | AirSpeed back panel | Mesh back panel |
| Hydration Compatible | Yes, 2.5L reservoir | Yes, 2.5L reservoir |
| Hip Belt | Padded | Minimal/webbing |
| Frame | Internal framesheet | Frameless |
| Rain Cover | Integrated | Not included |
| Price Range | $80-$110 | $60-$85 |
My Experience With The Osprey Hikelite
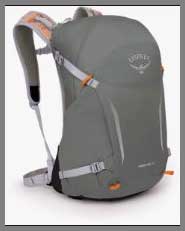
I remember the first time I loaded up my Hikelite 26 for a day hike in the Cascades. The weight distribution felt immediately different from my old generic pack—it was like the bag disappeared once I adjusted the straps properly. The AirSpeed back panel kept air flowing between my back and the pack, which made a noticeable difference when I was climbing steep switchbacks under the midday sun.
What really impressed me during those initial outings was how the internal framesheet maintained the pack’s shape even when I hadn’t filled it completely. I’m someone who tends to overpack “just in case,” and the Hikelite handled my extra layers, first aid kit, and emergency shelter without turning into a saggy mess. The hip belt pockets became my go-to spots for trail snacks and my phone, keeping them accessible without breaking stride.
The integrated rain cover proved its worth sooner than I expected. Three hours into a ridge hike, dark clouds rolled in and dumped rain for a solid forty minutes. While I was fumbling with my rain jacket, I suddenly remembered the rain cover tucked into its bottom compartment. Within seconds, my pack was protected, and my spare clothes stayed bone dry. That feature alone has saved my gear more times than I can count.
However, I did notice some trade-offs. The Hikelite is heavier than ultralight alternatives, which became apparent on longer days when fatigue set in. During a 15-mile trek, those extra ounces felt more significant in the final miles. The pack also runs a bit narrow, which made fitting wider items like a puffy jacket slightly challenging until I learned the proper packing technique.
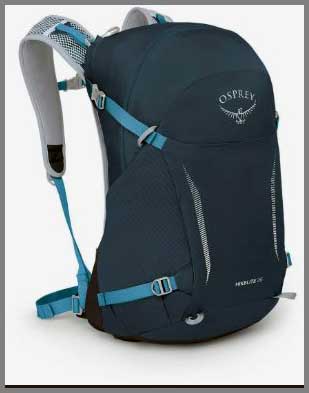
My Experience With The Osprey Sportlite

Switching to the Sportlite 20 felt like stepping into a completely different category of pack. The first thing I noticed was the weight—or rather, the lack of it. Picking up the empty pack felt almost comical compared to the Hikelite. This minimal design philosophy extends throughout the entire bag, from the simple webbing hip belt to the absence of unnecessary pockets and features.
I took the Sportlite on a fast-and-light mission through some technical terrain where speed mattered more than carrying capacity. The pack’s lightweight construction let me move quickly without the burden of extra material bouncing around. The mesh back panel provided adequate ventilation for cooler weather hikes, though I found myself missing the superior airflow of the Hikelite’s suspended system during warmer conditions.
The frameless design gives the Sportlite impressive packability—I’ve stuffed it into my luggage for travel and pulled it out for day trips from base camp. This versatility makes it excellent for multi-purpose use beyond just hiking. However, this same frameless construction means the pack loses structure when partially loaded. I learned quickly that the Sportlite performs best when you pack it strategically, placing softer items against your back and heavier gear in the middle.
One challenge I encountered was the minimal hip belt. While it keeps weight down, it doesn’t transfer load to your hips as effectively as the Hikelite’s padded version. On shorter hikes with lighter loads, this wasn’t an issue. But when I pushed the capacity limits with camera gear and extra water, my shoulders felt the strain after a few hours. The lack of an included rain cover also meant purchasing a separate one, adding to the overall investment.
Pros Of The Osprey Hikelite
- Superior Back Ventilation: The AirSpeed suspension system creates genuine airflow between your back and the pack through a tensioned mesh panel. I’ve used this pack in 85-degree heat, and while I still sweat, the ventilation prevents that swampy feeling you get with packs that sit flush against your back. The suspended mesh design uses a peripheral frame to hold the panel away from your body, allowing air to circulate continuously even during strenuous climbs.
- Integrated Rain Cover: Having a rain cover built into the bottom compartment means you’re always prepared for unexpected weather without adding bulk or remembering to pack an extra accessory. The cover deploys in seconds and fits snugly over the entire pack, with elastic edges and a small clasp to secure it. I’ve been caught in several downpours, and the cover has protected my gear flawlessly every time. The bright color also increases visibility in poor weather conditions.
- Load-Bearing Hip Belt: The padded hip belt effectively transfers weight from your shoulders to your hips, which makes a substantial difference on longer hikes or when carrying heavier loads. The padding is firm enough to provide support but soft enough to remain comfortable against your hip bones. The dual zippered pockets on the belt are perfectly sized for frequently accessed items like energy bars, lip balm, or a small camera. These pockets have become so essential to my hiking routine that I find myself missing them when using other packs.
- Structured Shape Retention: The internal framesheet maintains the pack’s structure regardless of how full or empty it is, making packing and organization much easier. You can load gear in any order without the pack collapsing into itself, and the defined shape helps you visualize available space. This structure also prevents hard or angular items from poking into your back, adding to overall comfort.
- Multiple Size Options: With 18L, 26L, and 32L variants available, you can choose the capacity that matches your typical hiking needs. I opted for the 26L as a middle ground that handles everything from quick morning hikes to full-day adventures. The size variety means you’re not paying for capacity you won’t use or struggling with insufficient space.
- Hydration System Integration: The dedicated hydration sleeve accommodates up to a 2.5-liter reservoir, with an internal clip to secure it and ports on both shoulders for hose routing. The sleeve is positioned perfectly to keep the water weight centered and doesn’t interfere with other packed items. I can easily slide the reservoir in and out for refilling without unpacking everything else.
- Durable Construction: The 210D nylon fabric has withstood countless encounters with rough granite, scrambling through brush, and the general abuse of regular trail use without showing significant wear. The bottom panel uses even more robust material to resist abrasion when you set the pack down. Zippers operate smoothly after dozens of uses, and the stitching remains intact throughout.
- Thoughtful Pocket Placement: The external stretch mesh pocket on the front is deep enough to secure a damp rain jacket or extra layer without items bouncing out. Side stretch pockets hold water bottles securely, even during aggressive hiking, and remain accessible while wearing the pack. An internal zippered pocket keeps valuables organized and protected.
- Comfortable Shoulder Straps: The shoulder straps feature substantial padding that distributes pressure evenly across your shoulders without creating hot spots. The sternum strap includes an emergency whistle, adding a safety feature without extra weight. Strap adjustment is smooth and holds position once set, even during dynamic movement.
- Reasonable Price Point: For the features and build quality provided, the Hikelite offers excellent value in the $80-$110 range. You’re getting Osprey’s legendary quality and warranty without breaking into premium pricing territory.
Read more: My Thoughts on CCIYU Auto Parts
Cons Of The Osprey Hikelite
- Heavier Weight: At 0.95 to 1.3 pounds depending on size, the Hikelite weighs noticeably more than minimalist alternatives like the Sportlite. For ultralight enthusiasts or those counting every ounce, this weight can feel excessive. During long days covering significant mileage, I’ve definitely felt those extra ounces adding up, particularly when fatigue sets in during the final miles. The weight difference might seem trivial on paper, but it becomes tangible when you’re ten miles into a hike.
- Narrow Profile: The pack’s design favors a streamlined profile, which can make fitting wider items challenging. My down jacket requires strategic stuffing to fit properly, and I’ve had to compress sleeping bag samples to get them to cooperate. If you regularly carry bulky gear or prefer a more relaxed packing style, this narrow cut can feel restrictive. The trade-off is better weight distribution and less side-to-side swing, but you’ll need to be more thoughtful about what you bring.
- Limited Compression Options: While the pack includes some compression straps, they’re not as extensive as what you’ll find on larger backpacking packs. When carrying a lighter load, you can’t cinch the pack down as effectively as I’d like. This can lead to some internal shifting of gear if you’re not carrying the pack relatively full. I’ve learned to pack more carefully on shorter trips to minimize this movement.
- Hip Belt Can Feel Bulky: For shorter individuals or those with smaller frames, the padded hip belt might feel oversized compared to your torso proportions. While I appreciate the support it provides, I’ve heard from friends with different body types that it can feel like it’s wearing them rather than the other way around. The belt doesn’t remove completely, so you’re carrying that structure and weight even when you might not need it.
- Ventilation Panel Reduces Capacity: The AirSpeed back panel system, while excellent for airflow, does occupy space that could otherwise be used for gear. This means the advertised capacity isn’t entirely available for packing—you’re trading some volume for comfort. I’ve noticed that the internal dimensions feel slightly smaller than the liter rating suggests when compared to frameless packs.
- Rain Cover Storage Takes Space: While having an integrated rain cover is convenient, the bottom compartment dedicated to storing it takes up valuable space that could be used for gear. The compartment isn’t accessible from the main packing area, so you can’t repurpose it easily. This is a minor quibble given the convenience factor, but worth noting for maximalists.
- Hydration Sleeve Not Divided: The main compartment and hydration sleeve aren’t fully separated, which means a leaking reservoir could potentially affect your other gear. I’ve learned to always check my reservoir’s seal carefully before heading out. A dedicated, isolated sleeve would provide better protection against this admittedly rare scenario.
- Sternum Strap Position: The sternum strap slides along the shoulder straps for adjustment, but I sometimes find it migrates during use, requiring readjustment. The mechanism works fine, but it’s not as locked-in as some other systems I’ve used. This is a small inconvenience rather than a deal-breaker.
- Hip Belt Pockets Too Small For Some Phones: Modern phones keep getting larger, and the hip belt pockets haven’t kept pace. My current phone fits, but just barely, and I worry about it popping out during steep descents or scrambling. If you have one of the larger phone models, these pockets might prove too small for comfortable storage.
- Overkill For Minimalist Hikers: If you’re someone who prefers the bare essentials and values every ounce saved, the Hikelite includes more features than you might want or need. The structure, padding, and extra features add weight that ultralight purists will consider unnecessary.
Pros Of The Osprey Sportlite
- Impressively Lightweight: The Sportlite’s weight range of 0.75 to 1.0 pounds makes it one of the lighter packs in Osprey’s lineup, and you feel this advantage immediately when shouldering the pack. The reduced weight translates directly to less fatigue over long distances and allows you to move faster on the trail. For fast-packing or when every ounce matters, this weight savings is genuinely significant. I’ve noticed that at the end of long days, the lighter pack means I’m less exhausted and can enjoy the final miles rather than just suffering through them.
- Highly Packable Design: The frameless construction and minimal features mean the Sportlite compresses down remarkably small when empty. I’ve stuffed it into the corner of my main backpacking pack for multi-day trips where I want a day pack for summit bids from base camp. It also travels exceptionally well, taking up minimal luggage space while providing a functional pack for daily adventures at your destination. This versatility extends the pack’s usefulness beyond just hiking.
- Streamlined Simplicity: Without excessive pockets, attachments, or features, the Sportlite embodies a “less is more” philosophy that some hikers genuinely prefer. There’s nothing to break, fewer zippers to fail, and less to think about when packing. This simplicity can be liberating if you find yourself overwhelmed by too many organizational options. The straightforward design also makes the pack nearly foolproof to use.
- Excellent Value Proposition: At $60-$85 depending on size, the Sportlite offers Osprey quality and warranty backing at an accessible price point. For budget-conscious hikers or those wanting a secondary pack without major investment, this pricing is attractive. You’re getting a well-constructed pack from a reputable brand without premium pricing.
- Mesh Back Panel Breathability: While not as advanced as the Hikelite’s suspended system, the mesh back panel still provides reasonable ventilation and prevents the pack from sitting directly against your back. In moderate temperatures, the breathability is adequate, and the simpler system means less weight and complexity. The mesh is durable and hasn’t shown wear despite regular use.
- Responsive To Load Changes: The frameless design makes the pack highly responsive to how you pack it, molding to your gear configuration. This flexibility can be advantageous when carrying oddly-shaped items or when you want the pack to conform closely to your body. Properly packed, the Sportlite hugs your back and moves with you naturally.
- Multiple Capacity Options: Like the Hikelite, the Sportlite comes in 15L, 20L, and 25L sizes, letting you choose the right capacity for your needs. The smaller sizes are perfect for minimalist hikers, while the 25L can handle more substantial day loads. This range ensures you’re not paying for unused capacity.
- Hydration Compatible: Despite its minimalist design, the Sportlite accommodates a hydration reservoir up to 2.5 liters, with a sleeve and hose port. Staying hydrated without stopping to access bottles is convenient, and the system integrates cleanly without adding bulk. The sleeve position keeps water weight centered for better balance.
- Front Stretch Pocket: The external stretch mesh pocket swallows layers, snacks, or wet gear with impressive capacity. I’ve crammed surprisingly bulky items into this pocket, and the elastic material secures them reliably. The pocket’s depth prevents items from bouncing out during active movement.
- Low-Profile Movement: The streamlined design and lack of external attachments mean the Sportlite doesn’t catch on branches or scrape against rock faces during technical sections. When navigating tight spaces or scrambling, the low profile becomes a definite advantage. The pack essentially disappears from your awareness during movement.
- Side Water Bottle Pockets: The stretch side pockets hold standard water bottles securely and remain accessible while wearing the pack. The elastic material accommodates different bottle sizes, from slim filtered bottles to wider Nalgenes. I can grab and stow bottles without breaking stride.
- Durable Material: Despite the lightweight construction, the fabric has proven durable through regular use. The 210D nylon resists abrasion and hasn’t developed any tears or weak spots. Osprey’s reputation for durability extends even to their minimalist offerings.
Read more: Comparison Of Leatherman Free T2 And Victorinox
Cons Of The Osprey Sportlite
- Minimal Hip Belt Support: The basic webbing hip belt provides minimal load transfer to your hips, leaving your shoulders to carry most of the weight. While this is fine for lighter loads or shorter distances, it becomes uncomfortable when you approach the pack’s capacity limits or extend your hiking duration. I’ve experienced shoulder fatigue on longer days that I don’t encounter with the Hikelite’s padded belt. The minimal padding also means the belt can dig in slightly when cinched tight with heavier loads.
- No Included Rain Cover: Unlike the Hikelite, the Sportlite doesn’t come with an integrated rain cover, which means purchasing one separately or accepting that your gear might get wet. I initially tried using a trash bag liner as a budget solution, but eventually bought a proper cover for better protection. This additional purchase adds to the overall cost and removes some of the price advantage over the Hikelite.
- Frameless Construction Limitations: Without an internal frame, the pack loses structure when not fully loaded and can become difficult to pack efficiently. Items shift around more readily, and the bag tends to collapse into itself, making organization challenging. Hard or angular items can poke into your back without the frame’s barrier. I’ve learned that the Sportlite requires more thoughtful packing to maintain comfort and functionality.
- Less Effective Ventilation: The mesh back panel provides some breathability, but it doesn’t match the AirSpeed system’s airflow. On hot days or during strenuous climbs, my back gets noticeably sweatier with the Sportlite than with the Hikelite. The pack sits closer to your body, reducing air circulation. If you run hot or hike in warm climates frequently, this ventilation difference becomes significant.
- Fewer Organizational Features: The stripped-down design means fewer pockets and organizational options. There’s no internal security pocket for valuables, no hip belt pockets for quick-access items, and limited separation of gear. Everything goes into essentially one main compartment, which can become a disorganized jumble if you’re not careful. I find myself digging through the pack more often to locate specific items.
- Limited Load Capacity Comfort: While the pack can technically hold up to 25 liters in the largest size, carrying it fully loaded becomes uncomfortable due to the minimal frame and hip belt support. The sweet spot is probably around 60-70% capacity for comfortable all-day carry. Pushing beyond this point leads to discomfort and poor weight distribution.
- Minimal Padding On Straps: The shoulder straps have less padding than the Hikelite, which is fine for lighter loads but becomes noticeable as weight increases. The thinner straps can create pressure points during extended wear, particularly if you have narrow shoulders. The reduced padding contributes to weight savings but at the cost of some comfort.
- Sternum Strap Basic: The sternum strap is functional but doesn’t include extras like the whistle found on the Hikelite. It’s a simple buckle system that works but offers no additional features. This fits the minimalist philosophy but means giving up small convenience and safety elements.
- Pack Doesn’t Stand Up: The soft construction means the pack flops over when you set it down, rather than standing upright like structured packs. This makes packing and unpacking less convenient, as you’ll often be working with the pack lying on its side. It’s a minor inconvenience but one that accumulates over repeated use.
- Less Protection For Gear: Without substantial padding or structure, delicate items like cameras or electronics are more vulnerable to bumps and impacts. You’ll need to provide your own protection through cases or strategic packing with soft items as cushioning. The Hikelite’s structure offers more inherent protection for valuable gear.
Maintenance Tips For The Osprey Hikelite
- Regular Cleaning Protocol: After particularly dusty or muddy hikes, I empty the pack completely and shake out all loose debris before it has a chance to work into seams or abrade the fabric. For deeper cleaning, I fill a bathtub with lukewarm water and a small amount of technical gear wash specifically designed for outdoor equipment. Avoid regular detergents as they can damage the fabric’s DWR coating and compromise water resistance. Submerge the pack and gently agitate the water, paying special attention to the shoulder straps and hip belt where body oils and sweat accumulate most heavily. Use a soft brush for stubborn dirt, but never a stiff bristle brush that could damage the fabric. Rinse thoroughly with clean water until no soap remains, as residue can attract dirt.
- Proper Drying Techniques: Never put the Hikelite in a dryer, as the heat can damage both the fabric and the back panel suspension system. Instead, hang the pack upside down in a well-ventilated area away from direct sunlight, which can degrade nylon over time. Open all zippers and pockets to ensure air circulation throughout the entire pack. I usually stuff the main compartment lightly with towels to help maintain shape during drying and absorb excess water. The back panel deserves particular attention—ensure the mesh is fully dry before storage to prevent mildew growth.
- Zipper Care And Maintenance: The zippers on the Hikelite are durable, but they benefit from occasional maintenance to keep them operating smoothly. I periodically clean zipper teeth with an old toothbrush to remove dirt and debris that can cause snags or difficult operation. After cleaning, I apply a small amount of zipper lubricant or even plain wax to the teeth, then work the zipper back and forth several times to distribute the lubricant. This simple maintenance has kept my zippers operating like new despite hundreds of uses. Always close zippers before washing to prevent damage to the sliders and to keep the teeth from catching on fabric.
- Frame And Suspension Inspection: The internal framesheet and AirSpeed back panel are the heart of the Hikelite’s comfort system, so they deserve regular inspection. After every several hikes, I check the frame for any signs of bending or damage, though I’ve never encountered issues. The mesh back panel should be inspected for tears, loose stitching, or worn spots where friction occurs. The attachment points where the mesh connects to the frame are particularly important—any loosening here can compromise the entire suspension system. If you notice any damage, contact Osprey’s warranty department, as they stand behind their products.
- Strap And Buckle Maintenance: The various straps and buckles endure significant stress and environmental exposure. I regularly check all buckles for cracks or wear, ensuring they snap together securely and release smoothly. Straps should be inspected for fraying, particularly at stress points where they pass through buckles and adjustment mechanisms. If straps become stiff from dirt or salt accumulation, cleaning them during your regular pack washing helps restore flexibility. The webbing compression straps benefit from occasional checking to ensure they still hold tension properly.
- Storage Best Practices: When not in use, I store my Hikelite loosely stuffed in a cool, dry location away from direct sunlight and temperature extremes. Never store the pack compressed or tightly packed, as this can damage the back panel structure and cause permanent deformation. I leave all buckles unfastened and straps loosened to prevent stress on these components during storage. The pack should be completely dry before storage to prevent mildew or odor development. I place a few dryer sheets inside to keep the interior fresh, though cedar blocks work well too.
- Rain Cover Maintenance: The integrated rain cover needs occasional attention to maintain its effectiveness. After using it in wet conditions, pull it out and allow it to dry completely before returning it to its storage compartment. Moisture trapped in the storage pocket can lead to mildew or unpleasant odors. Periodically inspect the elastic edges and attachment points for wear or damage. If the rain cover loses its water-repellent properties, you can restore them with a spray-on DWR treatment designed for technical fabrics.
- Hydration System Care: If you use the hydration sleeve, the reservoir needs proper care to prevent mold growth and maintain water taste quality. After each use, I empty the reservoir completely, rinse it with clean water, and dry it thoroughly with both the cap and hose removed. Store the reservoir outside the pack with all components separated and air-drying. The sleeve itself should be wiped down periodically to remove any moisture or residue that might accumulate.
- Proactive Repair Approach: Small issues can become big problems if ignored. I carry a repair kit that includes tenacious tape for fabric tears, spare buckles, and strong thread for emergency repairs. Addressing small tears or loose stitching immediately prevents them from growing into major damage. Osprey’s All Mighty Guarantee means they’ll repair or replace damaged packs, but field repairs can keep you hiking when warranty service isn’t immediately accessible.
- Seasonal Deep Maintenance: At the end of each hiking season, I perform a thorough inspection and deep clean of my Hikelite. This includes checking every seam, testing every buckle under load, and inspecting all fabric for signs of UV damage or wear. This seasonal ritual helps me identify developing issues before they become problems and ensures the pack is ready for the next season. It’s also when I assess whether any components need professional repair or replacement.
Maintenance Tips For The Osprey Sportlite
- Simplified Cleaning Process: The Sportlite’s minimalist design makes cleaning straightforward, but it still requires proper care to maximize longevity. After dusty or dirty hikes, I shake out the pack vigorously and turn it inside out if possible to dislodge trapped debris. For washing, I use the same bathtub method as with the Hikelite, with lukewarm water and technical gear wash. The frameless construction means you can be slightly less gentle than with structured packs, but still avoid harsh scrubbing that could damage the fabric. The mesh back panel should be cleaned carefully with a soft cloth to preserve its integrity.
- Efficient Drying Methods: Without a complex suspension system, the Sportlite dries faster than the Hikelite, but proper technique still matters. Hang it upside down in a shaded, well-ventilated area with all pockets and compartments open. The main body can be turned inside out to accelerate drying. Because the pack is frameless, stuff it lightly with towels to maintain shape during drying and prevent fabric from staying compressed and wet in folds. Ensure the mesh back panel dries completely to prevent any mildew development.
- Zipper And Closure Care: The Sportlite uses fewer zippers than the Hikelite, but those it has still need maintenance. Clean zipper teeth regularly with a small brush, removing any dirt or organic matter that could cause binding. Apply zipper lubricant or wax sparingly to keep action smooth. The drawstring closure on the main compartment should be checked for fraying, as this thin cord endures constant friction. I’ve replaced drawstrings on other packs as preventative maintenance before they fail in the field.
- Fabric Inspection Routine: The lighter weight fabric used in the Sportlite means vigilance for damage is particularly important. After every few hikes, I inspect the entire pack under good lighting, looking for small tears, abraded areas, or stressed seams. Pay special attention to corners and high-wear areas like the bottom panel and where shoulder straps attach. The stretch mesh pockets should be checked for loose stitching or tears in the elastic material. Catching damage early allows for simple repairs rather than major reconstruction.
- Strap And Webbing Maintenance: The minimalist hip belt and shoulder straps still need regular inspection. Check where webbing passes through buckles for signs of fraying or damage. The sternum strap buckle should snap securely and release smoothly. Salt and sweat can stiffen the webbing over time, so washing helps maintain flexibility. If adjustable straps start slipping under load rather than holding position, cleaning the webbing often solves the problem by removing the slick buildup that reduces friction.
- Strategic Storage Approach: Store the Sportlite loosely packed or hanging in a cool, dry location away from direct sunlight. The lack of structure means the pack can be stored more compactly than the Hikelite without damage, but avoid storing it compressed under heavy items. All buckles should be unfastened and straps loosened. Ensure the pack is completely dry before storage, as the mesh panels can trap moisture. I toss in a moisture absorber packet to ensure the interior stays fresh.
- Waterproofing Maintenance: Since the Sportlite doesn’t include a rain cover, protecting your gear requires either a separate cover or waterproofing the pack itself. If using a separate cover, maintain it similarly to the Hikelite’s integrated version—dry thoroughly after use and store separately. Alternatively, you can treat the pack fabric with a DWR spray to improve water resistance, though this won’t provide the same protection as a dedicated cover. Reapply DWR treatment annually or when you notice water no longer beading on the fabric surface.
- Hydration System Maintenance: If using the hydration compatibility feature, follow the same reservoir care routine as with the Hikelite. Rinse thoroughly after each use, dry completely with all components separated, and store outside the pack. The hydration sleeve in the Sportlite is simpler than the Hikelite’s, but it still needs occasional wiping down to remove moisture and prevent bacterial growth.
- Minimalist Repair Kit: Given the Sportlite’s lightweight focus, I carry a compact repair kit that includes tenacious tape, a few feet of strong thread, a needle, and perhaps a spare buckle. The simpler construction means fewer components that can fail, but when something does break, being able to make field repairs keeps you hiking. The frameless design actually makes some repairs easier, as you’re working with simpler components.
- Load Distribution Awareness: Unlike structured packs, the Sportlite’s comfort depends heavily on how you pack it. I’ve learned that consistently packing heavier items in the middle of the pack, close to my back, reduces strain on the fabric and seams. Sharp or angular items should be wrapped in clothing to prevent them from wearing through the pack from the inside. This thoughtful packing extends the pack’s life and maintains comfort.
- Seasonal Assessment: Even though the Sportlite is simpler than the Hikelite, it still benefits from a thorough end-of-season inspection. Check all stitching, inspect fabric for UV damage or wear, test all buckles under load, and assess whether the pack needs any professional repairs. The lightweight construction means damage can progress faster than with burlier packs, making these regular assessments particularly important.
Frequently Asked Questions (FAQ)
The “best” Osprey backpack depends entirely on your specific needs. For technical day hiking with heavier loads, the Hikelite offers superior support and ventilation. For ultralight enthusiasts or casual hikers, the Sportlite provides excellent weight savings. For overnight trips, you’d want something from their backpacking line like the Atmos or Aether series.
Yes, the Hikelite is excellent for day hikes. The ventilation system keeps you comfortable, the rain cover protects gear from weather, and the padded hip belt distributes weight effectively for all-day comfort. It’s particularly well-suited for longer day hikes or when carrying camera equipment, extra layers, or substantial food and water.
The Sportlite 15 is good for minimalist hikers who carry light loads. It works well for short hikes, trail running with minimal gear, or as a summit pack from base camp. However, the 15-liter capacity is quite small for all-day adventures with layers, food, and safety gear. Most hikers find the 20L or 25L sizes more versatile.
The Sirrus is women-specific with body-mapped ventilation and more carrying capacity (24L-36L), designed for heavier loads and potentially overnight trips. The Hikelite is gender-neutral, lighter weight, and focused purely on day hiking. The Sirrus includes more features like additional pockets and attachment points, while the Hikelite emphasizes simplicity and efficiency for day use.
Conclusion:
After putting both packs through real-world testing across dozens of trails and conditions, I can confidently say that neither pack is objectively “better”—they excel in different scenarios. If you prioritize comfort on longer day hikes, need excellent ventilation, and want the security of integrated rain protection, the Hikelite justifies its extra weight and cost. The superior load distribution and organizational features make it the pack I reach for when I know I’ll be out for eight hours or carrying photography gear.
However, if you value every ounce saved, prefer moving fast and light, or want a packable option for travel, the Sportlite delivers impressive performance at a lower price point. I’ve grown to appreciate its simplicity for shorter hikes and the way it almost disappears on my back when properly loaded.
Your choice ultimately comes down to your hiking style—do you want maximum comfort and features, or minimum weight and complexity? Both packs represent Osprey’s quality and will serve you well for years of trail adventures. Consider honestly how you hike, what you typically carry, and which compromises you’re willing to accept, and the right choice will become clear.