Making the jump from a Nikon DSLR to the mirrorless Z system is exciting, but staring at a shelf full of beloved F-mount lenses brings on immediate anxiety. Do you have to sell them all? Thankfully, no. Nikon gave us the FTZ adapter, and later, the FTZ II.
But why did they make two versions, and does it really matter which one you choose? I’ve used both extensively on various Z bodies, from the original Z6 to the Z9. In this breakdown, I will help you determine if the original is just fine or if the sleeker sequel is a necessary upgrade for your specific shooting style.
A Brief Comparison Table
| Feature | Nikon FTZ (Original) | Nikon FTZ II (New) |
| Release Date | 2018 | 2021 |
| Physical Design | Integrated tripod foot/bump at bottom | Streamlined, cylindrical, no bump |
| Weight | Approx. 135 g (4.8 oz) | Approx. 125 g (4.5 oz) |
| Dimensions (Diameter x Length) | Approx. 70 mm x 80 mm | Approx. 70 mm x 70 mm |
| Tripod Socket | Yes (1/4″-20 on the adapter foot) | No (Must use camera or lens socket) |
| AF-S / AF-P / AF-I Compatibility | Full Autofocus & Auto Exposure | Full Autofocus & Auto Exposure |
| AF-D / AF (Screw Drive) Compatibility | Manual Focus Only (with focus peaking) | Manual Focus Only (with focus peaking) |
| VR (Vibration Reduction) | Supported (Lens VR works with IBIS) | Supported (Lens VR works with IBIS) |
| Build Material | Magnesium Alloy | Magnesium Alloy |
My Experience With Nikon FTZ Adapter
When I first bought my Nikon Z6 right after launch, the original FTZ adapter wasn’t really an optional accessory; it was a mandatory bridge to my existing photography life.
I had a bag full of fast primes and f/2.8 zooms that I wasn’t ready to mortgage my house to replace with native Z-mount glass immediately.
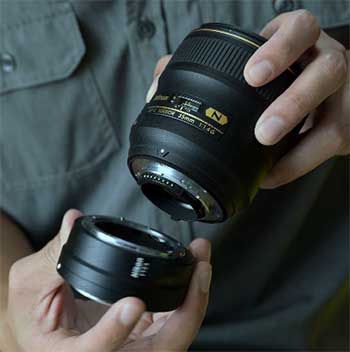
I remember pulling the FTZ out of the box and being surprised by its density.
It didn’t feel like a cheap plastic spacer; it felt like a piece of pro-grade camera equipment, crafted from magnesium alloy with a tough finish that matched the camera body perfectly.
Mounting it for the first time was a moment of truth. I clicked the adapter onto the Z6, then clicked my beat-up AF-S 70-200mm f/2.8G VR II onto the adapter. I turned the camera on, half-pressed the shutter, and… snap. It just focused. It was fast, accurate, and the VR system in the lens seemed to shake hands with the In-Body Image Stabilization (IBIS) in the camera seamlessly. For the first year of shooting mirrorless, that adapter practically lived on my camera body. It saved me thousands of dollars and allowed me to transition at my own pace.
However, the honeymoon phase with the physical design didn’t last forever. I started to notice the “chin” or the integrated tripod foot almost immediately when I tried to mount the camera on certain tripod heads. The blocky protrusion at the bottom containing the tripod socket hung down lower than the base of the Z6 body. While useful for balancing heavy lenses that lacked their own collars, it became a nuisance when I added an L-bracket to the camera, as the bracket had to be designed specifically to accommodate that hump. It was a brilliant functional tool with an annoying physical quirk.
Pros Of Nikon FTZ Adapter
- Flawless Electronic Integration: The most critical job of an adapter is to translate the language of the camera to the lens without an accent. The original FTZ does this perfectly. When using AF-S, AF-P, or AF-I lenses, the autofocus speed and accuracy feel virtually indistinguishable from using them on a native DSLR like a D850. Furthermore, the aperture control is precise, and the EXIF data is transmitted correctly. Perhaps the biggest technical achievement is how it handles Vibration Reduction. If your F-mount lens has VR, it works in conjunction with the Z-body IBIS (three-axis on the sensor, two-axis on the lens) to provide incredible stabilization that was never possible on DSLRs. Even non-VR lenses gain 3-axis stabilization from the camera body just by being mounted through the adapter.
- Robust Build Quality and Weather Sealing: Nikon didn’t cut corners here. The adapter is built to the same standards as their professional camera bodies. It is made from magnesium alloy, giving it a solid, dense feel that inspires confidence when hanging a heavy 500mm prime lens off the front of it. It features rubber gaskets on both the camera side and the lens side, maintaining the weather-sealing integrity of the system. I have used this adapter in drizzling rain and dusty environments without a second thought, knowing that the connection points were secure against the elements. It is a professional tool designed for professional abuse.
- The Integrated Tripod Foot Utility: While this feature is polarizing (and the main reason the FTZ II exists), it is a massive “pro” in specific scenarios. If you are using older, heavy primes or zooms that do not have their own rotating tripod collar—think of an older 80-200mm f/2.8 push-pull or a heavy macro lens—mounting the camera body to a tripod puts immense strain on the lens mount. The tripod socket on the FTZ adapter shifts the center of gravity forward, balancing the rig much better and taking stress off the camera’s Z-mount. For specific lenses, that little square block at the bottom is a necessary structural support.
Read More: My Thought on Pixie Lens Pro
Cons Of Nikon FTZ Adapter
- The Ergonomic Interference of the Tripod Foot: This is the single biggest complaint users, including myself, have with the original design. The integrated tripod socket hangs down significantly below the bottom plate of smaller Z bodies like the Z6 and Z7. This creates several issues. First, if you try to use a vertical battery grip (like the MB-N10), there is not enough clearance for your fingers to comfortably wrap around the vertical grip because the adapter’s foot is in the way. It is incredibly uncomfortable for portrait orientation shooting. Secondly, it interferes with many generic Arca-Swiss plates or tripod heads that have large platforms, as the bump hits the tripod head before the camera plate can lock in.
- Issues with L-Brackets and Cages: Because of that protruding “chin,” standard universal L-brackets do not fit Z cameras when the FTZ is mounted. You have to buy specialized L-brackets that are “FTZ compatible,” which usually means the bottom part of the bracket is shorter or cut away to make room for the adapter. This often compromises the stability of the L-bracket or makes it less comfortable to hold. If you are into video and use a camera cage, the FTZ’s foot often fouls the bottom rails or mounting points of many cages, requiring awkward workarounds or specific cage models.
- Lack of Screw-Drive Autofocus Support: This con applies to both the FTZ and FTZ II, but it bears repeating here as it was the initial disappointment with the original launch. Nikon has a massive legacy of excellent AF-D lenses that rely on a mechanical screw-drive motor in the camera body to focus. The FTZ adapters do not have this motor. Therefore, legendary glass like the 85mm f/1.4D or the 135mm f/2D DC become manual-focus-only lenses on Z cameras. While focus peaking makes manual focusing easier, it is a hard pill to swallow for photographers with extensive collections of “D” glass.
Maintenance Tips For Nikon FTZ Adapter
- Cleaning the Electronic Contacts Regularly: The FTZ acts as a bridge, meaning it has electronic contacts on both the front (F-mount side) and the back (Z-mount side).2 These gold contacts are crucial for transmitting autofocus instructions, aperture control, and EXIF data. If they get dirty with oil from your fingers or dust, you will start seeing communication errors between the lens and camera. I recommend using a microfiber cloth slightly dampened with >90% isopropyl alcohol to gently wipe these contacts every few months, or whenever you notice hesitant behavior. Do not use an eraser, as it can be too abrasive and leave residue.
- Checking the Aperture Stop-Down Lever: F-mount lenses use a mechanical lever to control the iris (aperture). The FTZ adapter has a corresponding mechanical motor and lever inside the barrel that physically moves the lever on the lens to change the f-stop at the moment of exposure. It is vital to keep this area clean. Sometimes dust or grit can get into the mechanism. You can gently use a rocket blower to dislodge debris around this internal lever. If that lever gets jammed or sticky, your exposures will be inconsistent, or the camera will throw an error because it cannot stop the lens down correctly.
- Proper Storage When Not in Use: Because the FTZ has exposed mechanical parts (the aperture lever) and sensitive electronics on both ends, it should not be tossed loosely into a camera bag compartment where it can bang against other gear. I always store mine with a rear Z-mount cap and a front F-mount body cap attached when it’s not on the camera. This protects the contacts and keeps dust out of the internal barrel. Furthermore, avoid storing it attached to a heavy lens for long periods if it’s not supported, just to minimize unnecessary constant strain on the mount flanges.
My Experience With Nikon FTZ II Adapter
When Nikon announced the Z9, their flagship mirrorless body with an integrated vertical grip, it became immediately obvious that the original FTZ adapter was going to be a problem.
The protruding foot of the original FTZ would occupy the exact space where your fingers need to go when holding the Z9 vertically. Enter the FTZ II.
I picked one up specifically because I was moving to larger Z bodies and using battery grips more frequently on my Z6 II.
Holding the FTZ II for the first time felt like holding the finished product that the original should have been.
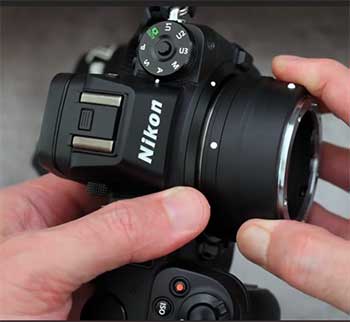
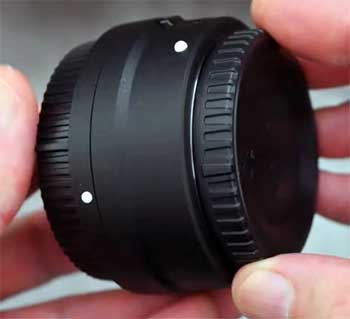
It is essentially a simple, clean cylinder. The controversial tripod foot is completely gone. It is slightly lighter, though the weight difference is negligible in real-world use. The build quality remains identical—same tough magnesium alloy, same reassuring weather-sealing gaskets.
Putting it onto the camera, the difference in ergonomics was night and day, especially with a battery grip attached. My fingers had nowhere to bump into in vertical orientation. It also made mounting the camera to my gimbal much easier, as the flat bottom of the camera could sit flush against the gimbal plate without the adapter getting in the way. Functionally? It was boringly identical to the first one. The autofocus speed, VR performance, and compatibility were exactly the same. The upgrade is purely physical, but for my usage, that physical change made all the difference in the world.
Pros Of Nikon FTZ II Adapter
- Superior Ergonomics and Streamlined Design: The removal of the tripod foot is the entire reason for this product’s existence, and it is a massive improvement for handling. The FTZ II is a smooth cylinder that stays out of your way. When shooting in portrait orientation using a vertical battery grip (like on a Z9, Z8, or Z6/Z7 with an MB-N grip), your fingers have the necessary clearance to grip the camera comfortably. With the original FTZ, your knuckles would constantly be jammed against the adapter’s foot. This streamlined profile also just looks better and makes the camera package more compact when stored in a bag.
- Improved Compatibility with Accessories: Because the bottom of the adapter is now flush with the lens barrel, it plays much nicer with third-party accessories. You no longer need specialized “cut-out” L-brackets; standard universal plates and brackets now fit perfectly against the camera body without obstruction. It also mounts much more easily onto complex tripod heads, video fluid heads with long plates, and gimbals where the original FTZ’s “chin” would often hit the mounting platform and prevent the camera from balancing correctly or locking down securely.
- Maintaining Same High Performance and Build: It is important to note that while stripping away the tripod foot, Nikon did not strip away quality. The FTZ II retains the exact same robust magnesium alloy construction and extensive weather sealing as its predecessor.3 It doesn’t feel cheaper or lighter-duty just because it is smaller. Furthermore, the electronic performance—AF speed with AF-S/AF-P lenses, aperture accuracy, and VR integration—is identical to the original FTZ. You are not sacrificing any performance metrics to gain the better ergonomics.
Cons Of Nikon FTZ II Adapter
- Loss of the Tripod Mounting Point: The feature that was a “con” for ergonomics on the original is a “pro” for utility that is now missing on the Mark II. By removing the integrated tripod foot, you lose that central balance point for certain lenses. If you are using a long, heavy, older F-mount lens that does not have its own tripod collar (like some older 70-300mm zooms or heavy macro lenses), you now have to mount the camera body directly to the tripod. This puts significant torque and strain on the camera’s lens mount. If you rely on that adapter foot for balancing specific awkward lenses, the FTZ II is actually a downgrade in functionality.
- The Cost of Upgrading: For many users who already own the original FTZ, the FTZ II is a tough sell because it offers zero functional improvements in terms of image quality or autofocus. It is purely an ergonomic fix. Paying full price again just to remove a metal bump can feel frustrating, especially since many users felt the original design was flawed to begin with. It feels less like a new product and more like a paid patch for a previous design oversight.
- Still No Support for Screw-Drive AF-D Lenses: Like its predecessor, the FTZ II lacks the internal focus motor required to drive older AF-D Nikkor lenses. This remains a significant sore point for long-time Nikon shooters with vast collections of classic glass. While Nikon has their engineering reasons for this omission (likely size, power draw, and complexity), it is a persistent disadvantage. These lenses mount and meter perfectly, but you are stuck with manual focus, relying on the Z cameras’ focus peaking and zooming aids to get sharp images.
Maintenance Tips For Nikon FTZ II Adapter
- Inspecting the Weather Sealing Gasket: The FTZ II relies on a rubber gasket on the rear (Z-mount side) to create a seal against the camera body, keeping moisture and dust out of the sensor box. Over time, rubber can dry out, crack, or get compressed. Every few months, take a close look at this rubber ring. It should be supple and free of nicks. If it looks dried out, you can apply a tiny amount of silicone grease designed for camera seals (be extremely careful not to get it on contacts or glass) to keep it conditioned, though usually, just keeping it clean is enough.
- Checking the Lens Release Mechanism: The adapter has its own lens release button and locking pin to secure F-mount lenses. Because this mechanism gets used every time you swap a lens, it can be a point of wear or a trap for grit. Ensure the release button depresses smoothly and springs back quickly. Make sure the locking pin protrudes fully when a lens is not attached. If this mechanism gets gritty, a blast of compressed air (from a rocket blower, never canned air) can help dislodge debris that might prevent a lens from locking securely.
- Standard Contact and Flange Cleaning: Just as with the original model, the gold electronic contacts are the lifeline of the system. Keep them clean with isopropyl alcohol and a microfiber cloth. Also, periodically wipe down the metal mounting flanges on both sides of the adapter. Metal-on-metal friction can sometimes create tiny metal shavings over years of use. Wiping these surfaces clean ensures a flat, parallel mount between lens and camera, which is critical for optical alignment and preventing tilt-shift effects that could soften corners of your images.
Read More: Comparison of Select 1.50 And 1.61 Lenses
Comparison with other brands
When discussing F-to-Z adapters that provide full autofocus and electronic integration, the conversation is very short: it’s Nikon or nothing. Unlike the Sony E-mount ecosystem, which has various third-party autofocus adapters (like Sigma MB-IV or Metabones for Canon glass), Nikon has kept the Z-mount protocols fairly tight. There are currently no reliable third-party adapters that translate Nikon F-mount AF-S/AF-P protocols to Nikon Z-mount autofocus. If you want your Nikon DSLR lenses to autofocus on your Z camera, you must use a Nikon FTZ or FTZ II.
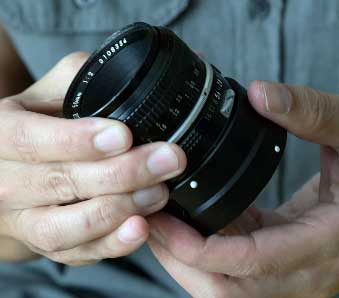
However, there is another category of adapters: “dumb” adapters. Brands like Fotodiox, K&F Concept, and Urth manufacture simple metal tubes with an F-mount on one side and a Z-mount on the other.4 These usually cost between $30 and $70. The massive disadvantage here is that they have zero electronic components. This means no autofocus, no VR transmission, no EXIF data, and most importantly for Nikon G-type lenses, no ability to control the aperture from the camera. Since G-lenses lack manual aperture rings, you are stuck shooting wide open or using clunky adapters with built-in manual iris sliders that are wildly inaccurate. These are only viable if you are strictly using very old, fully manual vintage lenses with physical aperture rings.
There is also a niche category of “tech” adapters, such as those from Techart or Megadap, which are designed to adapt other mounts (like Sony E or Leica M) to Nikon Z with autofocus capabilities.5 Some adventurous users have tried stacking adapters—putting a Nikon F lens on a Sony E adapter, and then mounting that to a Techart Sony-to-Nikon Z autofocus adapter. This is essentially Frankensteining a solution. It is expensive, clunky, unreliable, and the autofocus performance is abysmal compared to the native FTZ. For F-mount glass on Z bodies, the native Nikon FTZ/FTZ II remains the only serious professional choice.
Frequently Asked Questions (FAQ)
The only difference is physical. The original FTZ has a protruding “chin” with a tripod socket at the bottom. The FTZ II is a streamlined cylinder without the tripod foot, making it better for vertical grips and varied tripod heads.6 Electronic performance is identical.
Yes, if you use cameras with vertical grips (like the Z9, or Z6/Z7 with grip attached), or if the original adapter’s foot interferes with your tripod plates. If you never use vertical grips and don’t mind the bump, the original FTZ works exactly the same and is cheaper used.
It adds slightly to the length and weight of the lens. The main disadvantage is that it does not support autofocus for older Nikon AF-D “screw-drive” lenses; those lenses become manual focus only.
No. The FTZ adapter contains no glass elements. It is simply a hollow tube that sets the correct flange distance and translates electronic signals. Your lens’s optical quality remains exactly the same as it was on a DSLR.
Conclusion
When you look at the Nikon FTZ and the FTZ II side-by-side, the choice really comes down to ergonomics and how you hold your camera. It is important to stress that internally, these two devices are twins. You will get the exact same lightning-fast autofocus, incredibly useful VR integration, and robust weather sealing regardless of which one you clip onto your Z camera.
I recommend the original Nikon FTZ if you are a budget-conscious shooter, perhaps picking up a used Z6 or Z5, and you rarely use vertical battery grips. It is readily available on the used market for a great price. Furthermore, if you have some older, front-heavy lenses that lack tripod collars, that integrated foot on the original FTZ is actually a very useful feature for balancing your rig on a tripod.
I recommend the Nikon FTZ II if you are shooting with pro bodies like the Z9 or Z8, or if you use battery grips on your Z6/Z7 series cameras. The interference caused by the “chin” on the original model is a real frustration in vertical shooting scenarios. The streamlined design of the Mark II solves this completely and just feels more integrated with the modern Z system design language. If you are buying brand new today, the FTZ II is the logical choice to ensure maximum comfort and compatibility with future accessories.