I’m thrilled to share my experience with the Foam It 602 Polyurethane Spray Foam Insulation Kit, a game-changer for anyone looking to insulate their home efficiently. If you’re tired of high energy bills or drafty rooms, this kit is your answer.
It’s user-friendly, packed with everything you need, and delivers professional-grade results. Whether you’re sealing a basement or insulating an attic, this product saves money and boosts comfort. Trust me, you’ll wonder why you didn’t try it sooner—let’s explore why this kit deserves a spot in your home improvement arsenal.
My Journey With The Foam It 602 Kit
Picture this: a chilly winter morning in my old house, where I could feel drafts sneaking through the walls like uninvited guests.
My heating bill was through the roof, and I was fed up. That’s when I stumbled across the Foam It 602 Polyurethane Spray Foam Insulation Kit.
I’m no professional contractor, but I love a good DIY challenge, and this kit promised to make insulation a breeze. Spoiler alert: it delivered, but not without a few hiccups that taught me a thing or two.
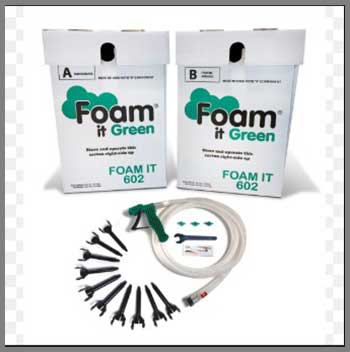
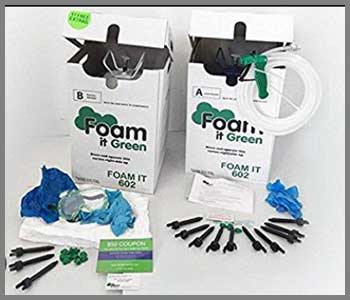
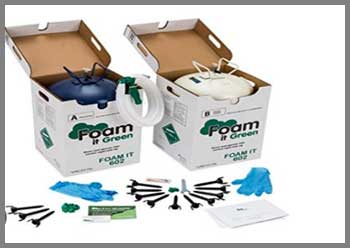
I ordered the kit online, and when it arrived, I was impressed by the hefty 120-pound package—steel canisters pressurized with nitrogen, a 15-foot hose, chemical-resistant gloves, and a pile of nozzles (three fan and ten conical). The instructions were clear, and the promise of 24/7 customer support gave me confidence. My goal was to insulate the attic and some exterior walls, about 600 square feet, to tame those energy bills.
The setup was straightforward. I suited up in a Tyvek suit (pro tip: get one size larger than you think you need), connected the hose, and shook the tanks as instructed to ensure proper mixing. The foam sprayed out a vibrant green, a cool feature that confirms the chemicals are blending correctly. I started in the attic, aiming for a one-inch thickness to hit the advertised 602 square feet of coverage. The fan nozzles were perfect for broad surfaces, while the conical ones tackled tight corners. It was messy—spraying overhead meant foam dripped onto my suit—but the results were immediate. The attic felt noticeably warmer within hours.
One challenge? The tanks need to be kept at the right temperature (around 75–85°F) for optimal flow. My garage was colder, so I had to warm them up first. Also, my arms were screaming after a few hours of spraying. I learned to pace myself, breaking the job into two days. By the end, my house felt like a fortress against drafts, and my heating bill dropped significantly. Last winter, I saved about $500 compared to the previous year. That’s real money back in my pocket, and it felt like a win.
Also Read: My Thoughts on Teeter Fitspine LX9.
Pros Of The Foam It 602 Kit
Let’s talk about why this kit is worth your time and money. I’ve used it, and I’ve seen the difference it makes. Here’s what stands out.
- High R-value for superior insulation: The Foam It 602 boasts an R-value of about 7 per inch, which means it’s fantastic at keeping heat in and cold out. My house went from drafty to cozy, and I noticed the difference in just one season.
- Seamless air sealing: This closed-cell foam fills every nook and cranny, creating a tight barrier against air leaks. I could feel the difference in my attic—no more chilly drafts sneaking through.
- Anti-mold formula: The kit includes an ASTM G-21-rated anti-microbial formula, which resists mold growth. Living in a humid area, this gave me peace of mind that my insulation wouldn’t become a mold magnet.
- Fire-retardant properties: Rated as Class I E-84 fire-resistant, it meets building code standards. Knowing my insulation adds a layer of safety makes me sleep better at night.
- User-friendly design: The kit comes with everything—tanks, hose, nozzles, gloves, and detailed instructions. Even as a DIY newbie, I felt like a pro with the 24/7 support and videos to guide me.
- Energy savings: After insulating, my energy bills dropped significantly. I saved about $500 in one year, which means the kit could pay for itself in a few years depending on your usage.
These benefits made the Foam It 602 a standout for me. It’s not just insulation; it’s an investment in comfort and savings.
Cons Of The Foam It 602 Kit
No product is perfect, and I ran into a few challenges with the Foam It 602. Here’s what you need to know before you start spraying.
- High upfront cost: This kit isn’t cheap compared to fiberglass or cellulose insulation. It set me back more than I’d hoped, but the energy savings helped justify the price over time.
- Messy application: Spraying foam, especially overhead, is a sticky business. I had foam dripping on my suit and even my goggles. Prep your workspace well, or you’ll be cleaning for for ages.
- Health risks during application: The chemicals, like isocyanates, can cause respiratory or skin irritation if you’re not careful. I wore protective gear and ensured good ventilation, but it’s a serious consideration.
- Difficult to remove: Once this foam sets, it’s there to stay. If you ever need to remove it, you’re in for a tough job. I haven’t had to, but it’s something to think about for future renovations.
- Temperature sensitivity: The tanks need to be at the right temperature to work properly. I had to warm mine up in a cold garage, which added an extra step to the process.
- Potential mortgage issues: Some lenders get nervous about spray foam in homes, especially if it’s in the roof. I haven’t tried to sell my house yet, but I’ve heard it can complicate things.
These drawbacks didn’t outweigh the benefits for me, but they’re worth considering to avoid surprises.
Maintenance Tips For The Foam It 602 Kit
Keeping your Foam It 602 insulation in top shape is straightforward, but it takes a bit of care. Here’s how I’ve kept mine performing well.
Regular Inspections
I check my insulation every six months, especially in the attic where moisture can sneak in. Look for signs of water damage or mold, even though the anti-mold formula helps. If you spot any issues, address them quickly to prevent bigger problems.
Ensure Proper Ventilation
Closed-cell foam like this is great at sealing, but it can trap moisture if your home isn’t well-ventilated. I installed a small vent fan in my attic to keep air moving. It’s a simple fix that protects your insulation and your home’s structure.
Clean Application Area
Before spraying, I cleared my workspace of dust and debris. This helps the foam adhere properly and last longer. If you’re planning to use the kit, take time to prep—it makes a difference.
Monitor for Cracks or Shrinkage
Over time, spray foam can contract slightly, especially in extreme climates. I check for gaps where the foam might have pulled away from the framing. If you find any, you can touch them up with a smaller foam kit.
Follow Safety Protocols Post-Installation
After spraying, I stayed out of the area for 24 hours to let the fumes dissipate. Even now, I make sure my home is well-ventilated to avoid any lingering chemical off-gassing. It’s a small step for long-term safety.
These steps have kept my insulation working like a charm, and they’re easy enough for anyone to follow.
Comparison With Other Brands
I looked at other spray foam kits before settling on the Foam It 602. Here’s how it stacks up against some popular competitors, based on my research and experience.
Froth-Pak 620 Sealant
Froth-Pak 620 is another closed-cell foam kit, covering about 620 board feet at one inch.
It’s solid for energy efficiency with an R-value of around 6.6, slightly lower than the Foam It 602’s 7.
Its quick-cure formula hardens fast, which is great for pros but tricky for DIYers like me who need more time to adjust.
The kit includes a 15-foot hose and nozzles, similar to Foam It, but I found its instructions less beginner-friendly. It’s also pricier, and I didn’t love that it lacked the anti-mold feature I valued in Foam It.
Touch N Seal 4004520300
Touch N Seal’s 300 board feet kit is a low-density, open-cell foam, which makes it lighter and cheaper but less insulating than the Foam It 602. Its R-value is around 4, so it’s better for soundproofing than thermal insulation. I considered it for interior walls, but my priority was energy savings, so closed-cell Foam It won out. Touch N Seal is easier to apply in tight spaces, but it doesn’t offer the same air-sealing power or mold resistance, which was a dealbreaker for me.
Tiger Foam Quick Cure 200
Tiger Foam’s 200 board feet kit is another closed-cell option with an R-value of about 6. It’s compact and great for smaller projects, but I needed more coverage. Its dual-use nozzles (fan and cone) are handy, but Foam It’s green color indicator gave me more confidence in the mix. Tiger Foam cures fast, which is nice, but I found Foam It’s 24/7 support more reassuring as a first-timer. Tiger Foam is also slightly cheaper, but its smaller size meant I’d need multiple kits, driving up costs.
Read More: My Thoughts on North Moon Bubble Cleaner Foam.
Seal Spray Foam Can Kit
Seal Spray Foam’s can-based kit covers 600 board feet with 24 cans, making it portable for small jobs. Its R-value is only 4.37, so it’s not as insulating as Foam It. I liked that you could use one can at a time without wasting material, but the application felt less precise than Foam It’s gun and hose setup. For a big project like mine, cans would’ve been a hassle. Plus, it lacks the fire-retardant and anti-mold features that made Foam It stand out.
Each brand has its strengths, but Foam It 602’s balance of coverage, R-value, and user-friendly features made it my top pick.
My Results And Reflections
Using the Foam It 602 transformed my home. Before, I’d crank the thermostat to 70°F and still feel cold. Now, my house stays cozy at 65°F, and my energy bills reflect that. The closed-cell foam sealed gaps I didn’t even know existed, and the anti-mold formula gives me confidence in my humid climate. I also noticed less street noise—a bonus I hadn’t expected. The process wasn’t flawless; I underestimated the prep work and got tired fast, but the results were worth it. If you’re on the fence, I’d say go for it—just plan ahead and follow the instructions.
Tips For Getting Started
If you’re ready to tackle your own project with the Foam It 602, here’s my advice. First, prep your space like your life depends on it. Cover floors, tape off windows, and clear out anything you don’t want foamed. Second, invest in good protective gear—a Tyvek suit, gloves, goggles, and a respirator are non-negotiable. Third, watch the instructional videos on Foam It’s website. They helped me avoid rookie mistakes like spraying too fast. Finally, don’t rush. Break your project into manageable chunks to avoid fatigue. You’ll thank yourself when you’re not scrubbing foam off your skin.
Long-Term Benefits And Considerations
Over the past year, I’ve seen the Foam It 602’s impact firsthand. My energy savings are real—about $40 a month off my heating bill in winter. The insulation also adds structural strength to my walls, which is a nice perk in an older home. But I’ve heard whispers about spray foam causing issues when selling a house. Some lenders worry about moisture trapped in roofs, especially with closed-cell foam. I haven’t faced this yet, but it’s worth researching if you plan to sell soon. For now, I’m thrilled with the comfort and savings.
Environmental And Health Notes
I’ll be honest—spray foam isn’t the greenest choice. It’s made from petrochemicals, and the production process isn’t exactly eco-friendly. The blowing agents have a high global warming potential, which gave me pause. But the energy savings offset some of that impact over time. Health-wise, the installation process is the riskiest part. I was diligent about ventilation and protective gear, and I haven’t noticed any issues since. If you’re sensitive to chemicals, talk to a professional first. There are greener alternatives like cellulose, but they don’t match Foam It’s air-sealing power.
Frequently Asked Questions
Spray foam, like the Foam It 602, has some downsides. It’s expensive upfront compared to fiberglass or cellulose, and the installation can be messy—trust me, I had foam everywhere. The chemicals pose health risks if you don’t use proper gear or ventilation. Once applied, it’s tough to remove, which can complicate renovations. Some types, especially closed-cell, can trap moisture if not installed correctly, risking mold or structural damage. Finally, it may cause issues with home sales, as some lenders hesitate due to concerns about roof ventilation or removal costs.
Choosing the best spray foam depends on your needs. For my project, the Foam It 602 was ideal due to its high R-value (7 per inch), anti-mold formula, and user-friendly kit. Closed-cell foams like Foam It or Froth-Pak 620 are great for thermal insulation and air sealing, while open-cell options like Touch N Seal are better for soundproofing but less insulating. Foam It’s green color indicator and 24/7 support tipped the scales for me, but Tiger Foam or Seal Spray are solid for smaller jobs.
It’s not that you can’t sell a house with spray foam, but it can complicate things. Some lenders, like TSB or Skipton, won’t approve mortgages for homes with spray foam in the roof due to concerns about trapped moisture causing timber decay. This is especially true for closed-cell foam like Foam It 602. Buyers may also worry about removal costs or building code issues. I haven’t sold my house, but I’d recommend keeping installation records to show it was done right.
Some homeowners remove spray foam due to mortgage issues, as lenders may flag it as a risk. Others worry about improper installation leading to moisture problems, especially in roofs where ventilation is poor. Removal is also common during renovations, as spray foam is tough to work around. I’ve heard of folks switching to greener options like cellulose for environmental reasons. Removal is costly and can damage structures, so I’d only consider it if absolutely necessary—like if you’re selling and the buyer insists.
Conclusion
The Foam It 602 Polyurethane Spray Foam Insulation Kit is a must-have for anyone serious about cutting energy costs and boosting home comfort. It’s easy to use, delivers pro-level results, and saves you money in the long run. From sealing drafts to resisting mold, this kit has transformed my home, and I’m confident it can do the same for you. Don’t let high energy bills hold you hostage—grab this kit and take control of your home’s efficiency today.