I’ve spent countless hours tinkering with 3D printers, and Creality’s Ender 3 series has always been my go-to for budget-friendly, high-quality printing. In this article, I’ll walk you through my experience comparing the Ender 3 Pro and Ender 3 V2, two of Creality’s most popular models.
My goal is to help you decide which printer suits your needs by breaking down their features, performance, and quirks in a conversational, real-user style. With detailed pros and cons, a comparison table, and an FAQ, you’ll have everything you need to make an informed choice.
Comparison Table: Ender 3 Pro Vs. Ender 3 V2
| Feature | Ender 3 Pro | Ender 3 V2 |
| Price (Approx.) | $200–$250 | $250–$300 |
| Build Volume | 220 x 220 x 250 mm | 220 x 220 x 250 mm |
| Power Supply | Meanwell PSU | Meanwell PSU |
| Motherboard | 8-bit | 32-bit (silent TMC2208 stepper drivers) |
| Print Bed | Magnetic, flexible | Carborundum glass |
| Display | Monochrome LCD with knob | 4.3-inch color LCD with knob |
| Belt Tensioners | Not included | Included (X and Y axes) |
| Filament Knob | Not included | Included |
| Toolbox | Not included | Included |
| Noise Level | Moderate (50–60 dB) | Quiet (<50 dB) |
| Assembly Time | ~1 hour | ~1 hour |
| Footprint | 440 x 420 x 465 mm | 475 x 470 x 620 mm |
My Journey With The Ender 3 Pro
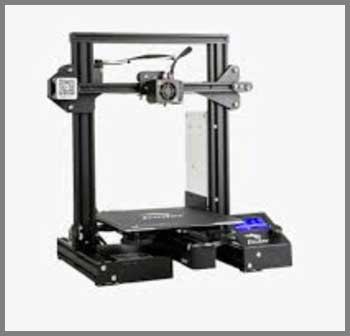
When I first unboxed my Ender 3 Pro, I was struck by its sturdy black aluminum frame and the promise of high-quality prints at a budget price. Released in 2018, the Ender 3 Pro was Creality’s answer to the original Ender 3’s minor flaws, and it quickly became a fan favorite. Setting it up took about an hour, with clear instructions and a decent set of tools included. The process felt like assembling a high-tech puzzle—challenging but rewarding.
The Ender 3 Pro’s standout feature is its Meanwell power supply, a significant upgrade from the original Ender 3’s unbranded PSU. I noticed faster heating times for the hotend and bed, which reached 110°C in under five minutes. This reliability meant I could start printing sooner, whether I was using PLA, PETG, or even ABS. The magnetic, flexible build plate was another game-changer. After printing, I could pop off models with a gentle bend, making removal a breeze compared to the original’s static bed.
However, the Ender 3 Pro isn’t perfect. The 8-bit motherboard, while functional, produces noticeable noise during operation—around 50–60 dB, similar to a conversation. I found myself printing a fan guard to reduce the hum, but it didn’t help much. Bed leveling also required frequent manual adjustments, which was a bit tedious before every print. The monochrome LCD and knob interface felt dated, especially when I compared it to newer models. Still, for its price—around $200–$250—the Ender 3 Pro delivered impressive print quality right out of the box.
Also Read: My Thoughts on Floor & Decor Vs. Home Depot.
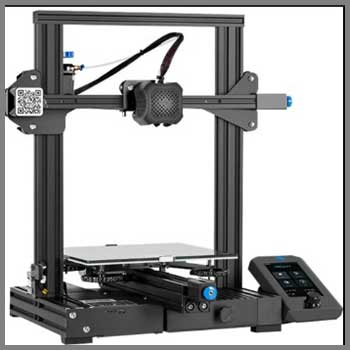
Exploring The Ender 3 V2
Fast forward to 2020, and I got my hands on the Ender 3 V2, Creality’s refined take on the Ender series. The V2 felt like a love letter to the community, incorporating user feedback into a sleeker, more modern design. Unboxing it, I noticed the same build volume (220 x 220 x 250 mm) but a slightly larger footprint due to the integrated toolbox and redesigned chassis. Assembly was similar to the Pro, taking about an hour, but the updated aesthetics—like the hidden power supply and plastic extruder cover—gave it a premium feel.
The Ender 3 V2’s 32-bit motherboard with silent TMC2208 stepper drivers was a revelation. Printing became whisper-quiet, under 50 dB, making it ideal for my home office. The carborundum glass bed was another highlight, offering excellent adhesion and a glossy first layer for my PLA prints. I also appreciated the X and Y belt tensioners, which made adjustments a snap compared to the Pro’s manual tweaks. The 4.3-inch color LCD, while still knob-controlled, was easier to navigate and felt more intuitive.
But the V2 had its quirks. The glass bed, while great for adhesion, is heavier, which can slightly affect print speed stability. I also found the “touchscreen-like” display misleading—it looks modern but isn’t touch-enabled, which threw me off initially. Priced at $250–$300, the V2 costs more than the Pro, and I wondered if the upgrades justified the extra expense for casual hobbyists.
Pros of the Ender 3 Pro
- Affordable Price: At $200–$250, it’s one of the best budget 3D printers for beginners and hobbyists.
- Meanwell Power Supply: Reliable, safe, and efficient, with faster heating for the hotend and bed.
- Flexible Magnetic Bed: Makes print removal easy and reduces the risk of damaging models.
- Sturdy Frame: The 40x40mm Y-axis extrusion improves stability over the original Ender 3.
- Open-Source Design: Allows for extensive customization and community-driven upgrades.
- Reliable Print Quality: Produces high-quality prints with PLA, PETG, and ABS right out of the box.
Cons of the Ender 3 Pro
- Noisy Operation: The 8-bit motherboard generates moderate noise (50–60 dB), which can be distracting.
- Manual Bed Leveling: Requires frequent adjustments, adding setup time before each print.
- Dated Display: The monochrome LCD and knob feel clunky compared to modern interfaces.
- No Belt Tensioners: Adjusting belts is a manual process, which can be fiddly for beginners.
- Basic Extruder Design: Lacks a filament knob, making manual filament loading less convenient.
- Potential PSU Issues: Some users report Creality switching to non-Meanwell PSUs, which may affect reliability.
Pros of the Ender 3 V2
- Silent Operation: The 32-bit motherboard with TMC2208 drivers keeps noise below 50 dB, perfect for home use.
- Carborundum Glass Bed: Offers excellent adhesion and a smooth first layer for glossy prints.
- Modern Display: The 4.3-inch color LCD is more user-friendly and visually appealing.
- Belt Tensioners: X and Y tensioners simplify belt adjustments, improving print consistency.
- Filament Knob: Makes manual filament loading easier and more precise.
- Integrated Toolbox: Keeps tools organized and accessible, a small but thoughtful addition.
Cons of the Ender 3 V2
- Higher Price: At $250–$300, it’s pricier than the Pro, which may not suit tight budgets.
- Heavier Glass Bed: Can slightly affect print speed stability due to increased weight.
- Non-Touch Display: The color LCD looks like a touchscreen but uses a knob, which feels deceptive.
- Similar Core Specs: Shares the same build volume and print speed as the Pro, limiting major performance gains.
- Manual Bed Leveling: Still requires manual adjustments, though large calibration nuts help.
- Larger Footprint: Takes up more desk space due to the redesigned chassis and toolbox.
Performance Comparison: Print Quality And Speed
Both printers share the same build volume (220 x 220 x 250 mm) and recommended print speed of 30–60 mm/s, with a maximum of 180 mm/s for risk-takers. In my tests, print quality was nearly identical for PLA and PETG, with both producing detailed models with minimal stringing. The Ender 3 Pro’s flexible bed made removing prints easier, but the V2’s glass bed gave a smoother first layer, especially for PLA. For ABS, the Pro’s 110°C bed temperature edged out the V2’s 100°C, offering better adhesion for high-temperature filaments.
Speed-wise, I stuck to 40–50 mm/s for most prints to balance quality and time. Pushing either printer to 180 mm/s led to shaky results, so I wouldn’t recommend it unless you’re experimenting. The V2’s silent operation made long print sessions more pleasant, while the Pro’s noise was noticeable during overnight prints. Both printers handled 200+ hour print marathons well, thanks to their industrial-grade circuit boards and power recovery features.
Ease Of Use And Assembly
As a tinkerer, I enjoyed assembling both printers, but beginners might find the process daunting. The Ender 3 Pro’s instructions were 95% accurate, though I had to double-check bolt sizes a couple of times. The V2’s assembly was similar, but the redesigned chassis and hidden PSU made cable management cleaner. Both took about an hour to set up, with YouTube tutorials filling in any gaps.
For daily use, the V2’s belt tensioners and filament knob made maintenance easier. The Pro’s lack of these features meant more time tweaking belts and loading filament manually. The V2’s color LCD also simplified navigation, though the knob control felt like a step back from a true touchscreen. Bed leveling was a chore on both, requiring 10–15 minutes of pre-print adjustments. I’d recommend investing in a BLTouch auto-leveling kit for either model if you want to save time.
Read More: My Thoughts on United Rentals Vs. Sunbelt Rentals.
Maintenance Tips
- Regular Bed Leveling: Check and adjust the bed before each print to ensure consistent first layers.
- Clean the Build Plate: Use isopropyl alcohol to remove residue and maintain adhesion on both beds.
- Lubricate Moving Parts: Apply lubricant to rails and screws every few months to reduce wear.
- Check Belt Tension: For the Pro, manually inspect belts; for the V2, use tensioners for quick adjustments.
- Update Firmware: Flash the motherboard with the latest firmware for improved performance and safety.
- Inspect the Hotend: Clear clogs and replace the nozzle periodically to maintain print quality.
- Secure Cables: Use zip ties to manage cables, especially on the Pro, to prevent loose connections.
Upgrades And Customization
Both printers are open-source, making them a tinkerer’s dream. I upgraded my Ender 3 Pro with a glass bed for smoother prints, which cost about $20. A BLTouch auto-leveling kit ($40) was a game-changer for both models, cutting down setup time. For the Pro, I also printed XY tensioners, mimicking the V2’s design. The V2’s 32-bit motherboard supports advanced firmware like Marlin, which I used to fine-tune print settings.
Community mods are endless—fan guards, cable organizers, even LED light strips for the V2. If you love customizing, the Pro’s lower price leaves more budget for upgrades, while the V2’s out-of-the-box features reduce the need for immediate tweaks. I spent hours on Reddit and Thingiverse, finding mods that turned both printers into personalized powerhouses.
Comparison With Other Brands
- Prusa i3 MK3S+: Offers auto bed leveling and a touch display but costs $700+, far pricier than both Enders.
- Anet A8: Cheaper at $150 but less reliable and requires more tinkering than the Ender 3 Pro or V2.
- Elegoo Neptune 3: Matches the V2’s features at a similar price ($250) but has a smaller community for support.
- Voxelab Aquila: A V2 clone at $200, with similar specs but inconsistent quality control.
- Anycubic Kobra: Includes auto bed leveling for $300 but has a smaller build volume than the Enders.
Who Should Choose Which Printer?
If you’re on a tight budget and don’t mind some noise or manual tweaks, the Ender 3 Pro is a fantastic choice. Its lower price and reliable performance make it ideal for beginners or hobbyists who want to upgrade over time. I chose the Pro initially because I wanted to customize it myself, and the $50–$100 savings let me invest in mods like a glass bed.
The Ender 3 V2 is perfect if you value silence, modern aesthetics, and user-friendly features like belt tensioners. It’s worth the extra cost if you’re printing in a shared space or want a more polished experience out of the box. I upgraded to the V2 for its quiet operation, which made late-night printing sessions less disruptive.
My Personal Verdict
After months of printing with both, I lean toward the Ender 3 V2 for its silent operation and thoughtful upgrades. The glass bed and belt tensioners saved me time, and the modern display made navigation a breeze. However, the Pro’s affordability and near-identical print quality make it a close contender, especially if you’re willing to tinker. Your choice depends on your budget, noise tolerance, and desire for convenience. Either way, both printers are stellar for hobbyists, and you can’t go wrong with Creality’s Ender 3 series.
Frequently Asked Questions (Faq)
No, the Ender 3 Neo, released in 2022, is a budget version of the V2 with a CR Touch auto-leveling system but lacks the V2’s 32-bit motherboard and silent drivers.
Reddit users note the Neo has auto bed leveling and a full-metal extruder, but the V2’s silent motherboard and glass bed offer quieter operation and smoother prints.
Yes, the Pro has a Meanwell PSU, a sturdier Y-axis, and a magnetic bed, improving reliability and ease of use over the original Ender 3.
Conclusion: Your Path To 3D Printing Success
You’re now armed with everything I’ve learned from my hands-on experience with the Ender 3 Pro and Ender 3 V2. Whether you choose the Pro’s budget-friendly reliability or the V2’s quiet, modern features, both printers will fuel your 3D printing adventures. Pick the one that fits your needs, and you’ll be crafting stunning prints in no time. Happy printing!