I’ve spent years using label printers for everything from home organization to small business shipping, and when it came time to choose between the Dymo LabelWriter 450 and the Dymo LabelWriter 550, I wanted a clear winner. In this article, I share my hands-on take on both models, breaking down their key features, real-world performance, and which one actually delivers better value today. My goal is to help you decide which printer fits your needs without any hype—just straightforward facts from someone who’s printed thousands of labels.
A Brief Comparison Table
| Feature | Dymo LabelWriter 450 | Dymo LabelWriter 550 |
| Print Speed | Up to 51 labels per minute | Up to 71 labels per minute |
| Label Compatibility | Works with Dymo and third-party/compatible labels | Exclusively works with Dymo-branded labels (RFID-locked) |
| Automatic Label Recognition | No | Yes – detects size, type, and remaining count |
| Print Resolution | 300 dpi | 300 dpi |
| Connectivity | USB | USB |
| Software Integration | Compatible with older Dymo software and many third-party apps | Updated Dymo Connect software, precise quantity printing |
| Price Range (Approximate) | Lower (often found used or remaining stock) | Higher upfront cost |
| Best For | Cost-conscious users okay with generics | Users wanting convenience and speed |
Right from the start, the 550 pulls ahead in speed and smart features, but the 450 holds strong on flexibility and cost savings.
My Experience With Dymo LabelWriter 450

I started with the Dymo LabelWriter 450 back when it was the go-to for reliable, no-fuss labeling.
It sat on my desk for years, handling everything from address labels for packages to organizing file folders and creating name tags for events.
The printer feels solid—compact design that doesn’t take up much space, and it connects via USB without any drama.
Setup took minutes: plug it in, install the software, and you’re printing.
What I loved most was how forgiving it is with supplies. I could grab cheaper compatible labels from various brands when official Dymo rolls ran low, and it never complained. Print quality stayed sharp at 300 dpi—crisp text, scannable barcodes, no smudging even on glossy surfaces.
Speed felt adequate for my needs; around 51 labels per minute meant I could knock out a stack of shipping labels quickly without waiting around.
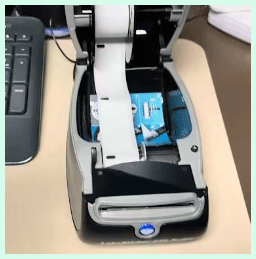
Over time, though, I noticed a few quirks. Without automatic recognition, I had to manually select the label type in the software every time I switched rolls, which got annoying during busy days.
The printer also ran a bit louder than I’d like, with that classic thermal clunk when feeding labels. Maintenance was simple, but dust buildup inside required occasional cleaning to keep prints consistent.
Even after years of heavy use, it rarely jammed if I loaded labels properly. I appreciated the straightforward drivers that worked across Windows and Mac without forcing updates.
For small home offices or side hustles, it delivered consistent results without breaking the bank. When supplies were affordable, running costs stayed low, making it easy to justify keeping it around.
I printed thousands of labels without major issues, and it became my reliable daily driver until newer models caught my eye.
Pros Of Dymo LabelWriter 450
- Flexible Label Options : You can use genuine Dymo labels or third-party compatibles, which saves significant money over time—especially if you print high volumes.
- Lower Upfront And Ongoing Costs : The printer itself is often cheaper now, and avoiding locked-in brand pricing keeps expenses down for budget users.
- Proven Reliability Over Years : Many units still work flawlessly after extensive use, with minimal breakdowns when handled normally.
- Wide Software Compatibility : It pairs well with older Dymo software and integrates smoothly with platforms like shipping apps, e-commerce tools, and more.
- Simple Setup And Use : Plug-and-play via USB, no complicated networks or extra steps needed for basic operation.
- Sharp 300 Dpi Printing : Produces clear, professional-looking labels suitable for addresses, barcodes, and organization tasks.
- Compact And Durable Build : Small footprint fits easily on desks, and the construction holds up well to regular daily use.
- No Forced Updates Or Locks : You avoid DRM restrictions that limit choices, giving full control over supplies.
- Easy To Find Used Units : Plenty available second-hand at low prices, ideal for testing or replacing without big investment.
- Consistent Performance Without Extras : Focuses purely on printing without unnecessary bells and whistles that could complicate things.
Also read: Comparison of Canon 2000d And Rebel t7
Cons Of Dymo LabelWriter 450
- Slower Print Speed : At up to 51 labels per minute, it lags behind newer models during high-volume tasks like bulk shipping.
- No Automatic Label Detection : You must select label size and type manually each time, which interrupts workflow when switching rolls.
- Limited Future Support : As a discontinued model, official updates and driver support may eventually taper off.
- Louder Operation : The mechanical sounds during printing and feeding stand out more than on some modern alternatives.
- Basic Feature Set : Lacks smart conveniences like remaining label counts or precise quantity controls without extra software tweaks.
- Potential For Jams If Loaded Incorrectly : Though rare, improper alignment can cause issues, requiring occasional manual fixes.
- Older Design Aesthetics : Looks dated compared to sleeker current models, though functionality remains strong.
- No Built-In Network Sharing : Strictly USB, so sharing across multiple computers needs workarounds.
- Harder To Find New Units : Stock dwindles, pushing buyers toward used or refurbished options.
- Less Efficient For Very High Volume : Struggles a bit with extremely fast turnaround needs in busy environments.
My Experience With Dymo LabelWriter 550
Switching to the Dymo LabelWriter 550 felt like moving to a more polished tool.
The moment I loaded the first roll, the automatic recognition kicked in— it instantly knew the label size, type, and how many were left.
That alone saved me time and frustration. Printing zipped along at up to 71 labels per minute, which made a real difference when churning out shipping batches or event tags.
The software update brought cleaner interfaces and better integration for precise runs—no more guessing or wasting partial rolls.
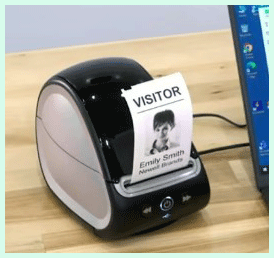
Build quality feels premium, with a quieter operation and smoother label feeding. I used it for address labels, product tags, and organizing storage bins, and the crisp 300 dpi output matched what I got from the older model but with less hassle.
The big catch hit when I tried cheaper labels: it refused them outright due to the RFID system. You’re locked into Dymo-branded rolls, which cost more.
Once I accepted that, though, the convenience shone through. No manual selection, accurate counts on screen, and faster speeds made daily tasks smoother. It handled high-volume days better, with fewer interruptions.
Jams were almost nonexistent thanks to better alignment, and the compact size fit my workspace perfectly. For anyone who prints regularly and doesn’t mind the premium on supplies, this printer streamlines the process noticeably.
Pros Of Dymo LabelWriter 550
- Faster Printing Performance : Up to 71 labels per minute cuts wait times significantly compared to older models.
- Automatic Label Recognition : Detects size, type, and remaining quantity instantly, eliminating manual setup.
- Improved Workflow Efficiency : Precise quantity printing and better software reduce waste and errors.
- Smoother And Quieter Operation : Less mechanical noise and reliable feeding enhance the user experience.
- Modern Software Features : Updated Dymo Connect app offers easier design and integration options.
- High Reliability In Daily Use : Handles consistent heavy loads with minimal jams or issues.
- Clear Display Of Label Info : See exactly what’s loaded and how much remains without guessing.
- Compact Yet Sturdy Design : Fits small spaces while feeling built to last.
- Better For High-Volume Needs : Speeds up tasks like shipping, organizing, or bulk labeling.
- Sharp Professional Output : 300 dpi ensures readable text, barcodes, and graphics every time.
Cons Of Dymo LabelWriter 550
- Locked To Dymo Labels Only : RFID tech blocks third-party or generic labels, forcing higher supply costs.
- Higher Overall Expenses : Premium pricing on official rolls adds up quickly for frequent users.
- More Expensive Upfront : Costs noticeably more than older or used alternatives.
- Limited Flexibility : No option to shop around for cheaper supplies when needed.
- Potential Frustration With DRM : The restriction feels unnecessary to many long-time users.
- Requires Accepting Brand Lock-In : Not ideal if you prefer mixing and matching label types.
- Slightly Bulkier Than Some Expect : Though compact, the design prioritizes features over minimalism.
- Software Still Tied To Dymo Ecosystem : Less open integration compared to fully flexible models.
- Overkill For Light Use : Extra features may go unused in low-volume scenarios.
- Availability Of Rolls Can Vary : Stock issues occasionally hit official supplies.
Maintenance Tips For Dymo LabelWriter 450
- Clean The Print Head Regularly : Use a lint-free cloth lightly dampened with isopropyl alcohol to wipe away dust and residue every few months.
- Avoid Overloading Rolls : Load labels carefully to prevent misalignment and reduce jam risks.
- Keep The Printer Covered : Use a dust cover when not in use to minimize buildup inside the mechanism.
- Check Label Alignment Often : Ensure rolls sit straight to maintain even printing and avoid uneven wear.
- Update Drivers When Possible : Grab the latest compatible drivers from official sources for smooth operation.
- Remove Partial Rolls Carefully : Store unused portions properly to prevent curling or damage.
- Inspect For Debris After Heavy Use : Clear any label bits from the feed path to keep things running smoothly.
- Use In A Stable Environment : Avoid extreme heat, humidity, or direct sunlight to protect internal components.
- Test Prints Periodically : Run a sample label to catch quality drops early and address them.
- Handle Power Cord Gently : Prevent strain on connections to avoid intermittent issues over time.
Maintenance Tips For Dymo LabelWriter 550
- Wipe Sensors Occasionally : Gently clean the automatic recognition sensors with a soft cloth to ensure accurate detection.
- Load Dymo Rolls Properly : Align RFID tags correctly for seamless recognition and feeding.
- Dust Exterior And Vents : Keep openings clear to prevent overheating during long print runs.
- Monitor Label Counts : Use the built-in display to reorder before running out completely.
- Avoid Force When Removing Jams : If rare jams occur, follow gentle release steps to protect internals.
- Keep Software Updated : Check for firmware or app improvements for optimal performance.
- Store In Moderate Conditions : Protect from dust, moisture, and temperature swings.
- Clean Print Head Sparingly : Use approved methods only when quality noticeably declines.
- Check USB Connection : Ensure stable cable to avoid print interruptions.
- Run Test Labels Monthly : Verify consistency and catch any emerging issues early.
Read more: Comparison of Fitbit Sense 2 And Fitbit Versa 4
Comparison With Other Brands
- Brother QL Series : Offers similar thermal printing but often includes more label variety and sometimes wireless options at competitive prices.
- Zebra Direct Thermal Printers : Built for heavier commercial use with faster speeds and broader compatibility, though bulkier and pricier.
- Roland Or Epson Models : Provide color printing capabilities beyond basic black thermal, ideal for graphics-heavy labels.
- Generic Chinese Brands : Much cheaper upfront with full third-party label support, but quality and durability vary widely.
- Arkscan Alternatives : Mimic Dymo functionality closely while allowing generic labels, often at lower cost.
- Munbyn Portable Options : Add mobility for on-the-go printing, unlike desk-bound Dymo units.
- Jadens Or Phomemo : Focus on compact, affordable Bluetooth models for light home use.
- Toshiba Or Datamax : Target industrial environments with rugged builds and high-volume endurance.
- Avery-Compatible Printers : Integrate well with sheet-style labels if you prefer non-roll formats.
- Urovo Or Honeywell : Emphasize enterprise features like network connectivity and advanced scanning integration.
Frequently Asked Questions (FAQ)
The 550 prints faster (up to 71 labels/min vs 51), features automatic label recognition, but locks to Dymo-only labels, while the 450 allows generics and costs less.
No, the 550 uses RFID to restrict to official Dymo-branded labels only—older 450 labels won’t function.
Yes, the Dymo LabelWriter 450 series has been discontinued by the manufacturer since around 2022.
Conclusion: For Both Products
I’ve used both the Dymo LabelWriter 450 and 550 extensively, and here’s my final take: if you want maximum flexibility, lower costs, and don’t mind slightly slower speeds or manual setup, stick with the 450—it’s still a solid workhorse, especially if you find one used. But if speed, automatic features, and hassle-free operation matter more to you, and you’re okay paying extra for official labels, go for the 550—it streamlines your day noticeably. Whichever you choose, think about your printing volume and budget first. What works best for your setup? Let me know in the comments if you’re deciding between them—I’d love to hear your thoughts!