I’ve spent countless hours tinkering with 3D printers, from assembling bare-bones kits to marveling at high-end machines that practically print themselves. Today, I’m putting two of AnkerMake’s most talked-about models, the M5 and M5C, under the microscope. My goal? To help you decide which of these printers is the right fit for your workshop, whether you’re a beginner crafting your first Benchy or a seasoned maker prototyping complex designs. Let’s break down their features, weigh their pros and cons, and figure out which one deserves a spot on your desk.
Comparison Table: AnkerMake M5 vs. M5C
| Feature | AnkerMake M5 | AnkerMake M5C |
| Price | $599-$799 | $299-$399 |
| Build Volume | 235 x 235 x 250 mm | 220 x 220 x 250 mm |
| Max Print Speed | 500 mm/s | 500 mm/s |
| Hotend | PTFE (260°C max) | All-metal (300°C max) |
| Extrusion Flow Rate | 24 mm³/s | 35 mm³/s |
| Display | 4.3″ Touchscreen | None (App/Button Control) |
| Camera | Yes (AI Failure Detection) | No |
| Bed Leveling | 49-point Auto-Leveling | 7×7 Auto-Leveling |
| Connectivity | Wi-Fi, USB-C, App | Wi-Fi, USB-C, App |
| Filament Support | PLA, PETG, ABS, TPU | PLA, PETG, ABS, TPU, Nylon, CF |
| Weight | 10.6 kg | 9.6 kg |
| Dimensions | 502 x 438 x 470 mm | 466 x 374 x 480 mm |
My Journey With 3D Printing
I got hooked on 3D printing a few years back when I built my first printer from a kit. It was a clunky, frustrating process, but the thrill of watching a digital model come to life layer by layer was worth every misaligned screw. Since then, I’ve tested dozens of printers, from budget-friendly Ender models to premium Prusas. When Anker, a brand I knew for chargers and cables, jumped into the 3D printing game with the M5, I was skeptical but intrigued. The M5C followed, promising a leaner, cheaper alternative. Naturally, I had to see how they stacked up.
AnkerMake M5: The Premium Powerhouse
The AnkerMake M5 hit the scene in 2022 via a wildly successful Kickstarter campaign, raising over $8.8 million. It’s a gantry-style FDM (Fused Deposition Modeling) printer designed for serious hobbyists and semi-professionals. Out of the box, it feels like a premium product—sleek, sturdy, and polished, with a design that screams “I mean business.”
Key Features of the M5
The M5’s standout feature is its speed. Anker claims it prints five times faster than traditional printers, with a default speed of 250 mm/s and a max of 500 mm/s. In my tests, it churned out a standard Benchy in about 30 minutes, compared to over an hour on my old Ender 3 Pro at 50 mm/s. That’s a game-changer if you’re iterating designs or just impatient like me.
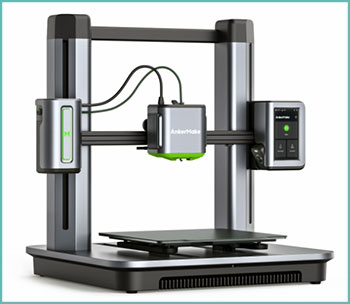
The 4.3-inch touchscreen is a joy to use. It’s crisp, responsive, and makes navigating settings a breeze. The built-in camera, paired with AI failure detection, lets you monitor prints remotely via the AnkerMake app. I loved watching time-lapse videos of my prints, though the AI’s “failure detection” sometimes flagged minor issues that didn’t actually ruin the print.
With a build volume of 235 x 235 x 250 mm, the M5 offers plenty of space for larger projects. Its 49-point auto-leveling system ensures the bed is perfectly aligned, reducing first-layer failures. The flexible PEI-coated steel plate makes print removal a snap—pop it off, flex it, and your model comes free without a scraper in sight.
The M5 supports a range of filaments: PLA, PETG, ABS, and TPU. However, its PTFE-lined hotend caps the nozzle temperature at 260°C, which limits exotic materials like nylon or carbon fiber-infused filaments. Assembly is straightforward, taking about 20 minutes, and the included toolkit is top-notch, with Allen wrenches, a side cutter, and even a spare nozzle.
Pros of the M5
- Blazing Speed: Default 250 mm/s with a 500 mm/s max cuts print times significantly.
- User-Friendly Interface: The touchscreen is intuitive, perfect for beginners and pros alike.
- Remote Monitoring: The camera and app let you keep tabs on prints from anywhere.
- Large Build Volume: 235 x 235 x 250 mm handles most hobbyist projects.
- Reliable Bed Leveling: 49-point auto-leveling minimizes setup hassles.
- Premium Build: Solid construction reduces vibrations, even at high speeds.
Cons of the M5
- Pricey: At $599-$799, it’s a big investment compared to budget printers.
- PTFE Hotend: Limited to 260°C, restricting some high-temp filaments.
- AI Quirks: The failure detection can be overly sensitive, causing unnecessary pauses.
- Noise: Fans and homing maneuvers can be loud, especially in a home setting.
- Slicer Limitations: The AnkerMake slicer lacks advanced features like tree supports.
In my experience, the M5 delivers consistent, high-quality prints with minimal tweaking. I printed a detailed skull model with tri-blend PLA, and the results were stunning, with only minor layer lines. However, I noticed some “ringing” (vibration-induced imperfections) at 250 mm/s, especially on smooth surfaces. Slowing it down to 150 mm/s improved quality without sacrificing too much speed.
AnkerMake M5C: The Budget-Friendly Contender
The M5C, released in 2023, is AnkerMake’s attempt to capture the entry-level market without skimping on performance. Priced at $299-$399, it’s significantly cheaper than the M5, but it trims some features to hit that price point. It’s a compact, no-frills machine that still packs a punch.
Key Features of the M5C
The M5C matches the M5’s max print speed of 500 mm/s, with a default of 250 mm/s. I printed a Benchy in 36 minutes, and while it showed some rough layers, the result was impressive for the price. The all-metal hotend, capable of 300°C, is a major upgrade over the M5’s PTFE version. This lets the M5C handle tougher filaments like nylon and carbon fiber-infused PETG, opening up more project possibilities.
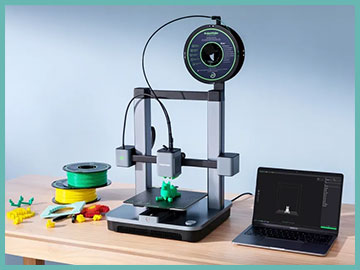
What sets the M5C apart is its minimalist approach. There’s no touchscreen or camera—just a single programmable “Play” button and the AnkerMake app for control. The button can pause, resume, or reprint the last file, but you’ll need the app or a computer for most tasks. I found the app intuitive, with an “Easy Mode” that’s perfect for beginners. You can grab a file from the app’s library, slice it, and print it in minutes.
The build volume is slightly smaller at 220 x 220 x 250 mm, but still ample for most hobbyist needs. The 7×7 auto-leveling system is less precise than the M5’s 49-point setup but gets the job done. The M5C’s aluminum alloy frame is sturdy, and its compact design (466 x 374 x 480 mm) fits easily on a desk. Assembly took me under 10 minutes, thanks to clear instructions and pre-mounted components.
Pros of the M5C
- Affordable: At $299-$399, it’s a steal for the performance.
- All-Metal Hotend: 300°C capability supports a wider range of filaments.
- High Speed: Matches the M5’s 500 mm/s max, with solid results at 250 mm/s.
- Compact Design: Smaller footprint is ideal for tight spaces.
- Easy Setup: Nearly plug-and-play, perfect for beginners.
- App Control: Streamlined interface makes printing accessible.
Cons of the M5C
- No Touchscreen: Relying on the app or PC can be inconvenient.
- No Camera: You can’t monitor prints remotely, a big miss for some.
- Smaller Build Volume: 220 x 220 x 250 mm limits larger projects.
- Basic Bed Leveling: 7×7 system is less precise than the M5’s.
- Limited Slicer Features: Like the M5, it lacks advanced customization options.
I tested the M5C with a planetary gear model in PLA, and it handled tight tolerances well after adjusting the layer height to 0.15 mm. The print had some minor surface artifacts, but nothing a little sanding couldn’t fix. The lack of a screen didn’t bother me as much as I expected, but I missed the M5’s camera when I wanted to check on a print from another room.
Also Read: My Thoughts On Ultimaker Vs. Makerbot
Head-to-Head Comparison
Let’s break down how these printers compare in key areas.
Price and Value
The M5’s $599-$799 price tag positions it as a premium option, while the M5C’s $299-$399 makes it a budget-friendly choice. For beginners or casual users, the M5C offers incredible value, delivering near-M5 performance for half the cost. However, the M5’s touchscreen and camera justify the price if you value convenience and remote monitoring. I found the M5C’s price-to-performance ratio hard to beat, especially for newbies who don’t need all the bells and whistles.
Build Quality and Design
Both printers feel solid, with aluminum alloy frames that minimize vibrations. The M5 is slightly larger and heavier (10.6 kg vs. 9.6 kg), giving it a more robust presence. The M5C’s compact design is a plus for small workspaces, but its open-frame construction (shared with the M5) isn’t ideal for homes with kids or pets, as there’s no enclosure option. I appreciated the M5C’s cleaner look, with fewer exposed cables, but the M5’s touchscreen adds a professional touch.
Print Speed and Quality
Both printers hit 500 mm/s max speed, with a default of 250 mm/s. In my tests, the M5 produced slightly smoother prints at default settings, thanks to its more precise bed leveling. However, the M5C’s all-metal hotend and higher extrusion flow rate (35 mm³/s vs. 24 mm³/s) make it better suited for high-temp filaments. At 500 mm/s, both showed some ringing, but slowing to 150 mm/s improved quality significantly. For most casual prints, the difference is negligible, but the M5 edges out for precision.
Filament Compatibility
The M5C’s 300°C hotend is a clear winner, supporting nylon, carbon fiber, and other specialty filaments that the M5’s 260°C PTFE hotend can’t handle. If you’re sticking to PLA or PETG, both work great, but the M5C’s versatility gives it an edge for advanced users. I printed a carbon fiber PETG part on the M5C, and the strength and finish were impressive.
Ease of Use
The M5’s touchscreen and camera make it more user-friendly for hands-on control and remote monitoring. The M5C’s app-only approach is simple but can be a hassle for tasks like filament changes, especially if you don’t always have your phone handy. That said, the M5C’s “Easy Mode” in the app is a godsend for beginners, letting you print with minimal setup. I found myself using the app more with the M5C, while the M5 felt more self-contained.
Connectivity and Software
Both printers offer Wi-Fi, USB-C, and app control, but the M5’s touchscreen reduces app dependency. The AnkerMake slicer is solid for basic tasks but lacks advanced features like organic supports, forcing me to use Cura for complex models. The M5’s camera integrates seamlessly with the app for time-lapses, while the M5C requires you to physically check the print. The app’s library of pre-sliced models is a nice touch for both, especially for beginners.
Maintenance and Reliability
Both printers are reliable, with minimal print failures in my tests. The M5’s 49-point leveling caught minor bed issues that the M5C’s 7×7 system missed, but both produced consistent results. The M5C’s all-metal hotend is more durable for high-temp printing, and both come with spare nozzles and toolkits. I swapped a nozzle on the M5C in minutes, and the process was identical on the M5.
Real-World Use Cases
To get a feel for these printers, I put them through real-world scenarios. For a beginner, I printed a simple phone stand on both. The M5C’s app made it a breeze—select the file, hit print, and it was done in under an hour. The M5’s touchscreen let me tweak settings on the fly, which was handy when I noticed slight under-extrusion.
For a more complex project, I printed a multi-part mechanical toy. The M5C handled the nylon gears beautifully, thanks to its hotend, but I had to babysit it without a camera. The M5’s larger bed and camera made monitoring the bigger parts easier, but I missed the M5C’s filament versatility.
For a classroom setting, the M5C’s affordability and simplicity make it a great choice for students, though the lack of an enclosure is a concern. The M5’s premium features suit advanced users or makerspaces where remote monitoring is valuable.
Which Printer Is Right for You?
Choosing between the M5 and M5C depends on your needs and budget. If you’re new to 3D printing or working with a tight budget, the M5C is a no-brainer. Its price, speed, and filament versatility make it a fantastic entry-level option, though you’ll sacrifice some convenience. If you want a more polished experience with a touchscreen, camera, and larger build volume, the M5 is worth the splurge, especially for serious hobbyists or small businesses.
I lean toward the M5C for its value and versatility, but I missed the M5’s camera during long prints. If you’re torn, consider how much you value remote monitoring versus cost savings. Either way, both printers deliver impressive performance for their respective price points.
Read More: My Thoughts On Snapmaker Vs. Prusa
Frequently Asked Questions (FAQ)
The M5 has a touchscreen, camera, and larger build volume (235 x 235 x 250 mm), while the M5C is cheaper, has an all-metal hotend (300°C vs. 260°C), and relies on app control with a smaller build volume (220 x 220 x 250 mm).
No, the M5C is not discontinued, but it’s sometimes out of stock due to high demand. It’s available new or refurbished through retailers like Amazon and eBay.
Yes, the M5C includes a filament runout sensor to pause prints when filament runs out, ensuring you don’t waste time on failed prints.
The M5C has a build volume of 220 x 220 x 250 mm, slightly smaller than the M5’s 235 x 235 x 250 mm.
My Final Thoughts
You can’t go wrong with either the AnkerMake M5 or M5C, but your choice hinges on what you value most. If you’re after a budget-friendly printer that punches above its weight, the M5C’s affordability, speed, and filament versatility make it a stellar pick. If you crave premium features like a touchscreen and remote monitoring, the M5 delivers a more refined experience. Both have transformed my 3D printing workflow, and I’m confident they’ll spark your creativity, too. So, grab your filament, fire up the app, and start printing—your next masterpiece is waiting!